Entity Framework is an Object Relational Mapper (ORM). ADO.NET is a very important framework in dot net. It provides developers to write code for data access, update the data and again store the updated data in the database in efficient manner.
Entity Framework enhances the capability of ADO.NET one more step. There is no need to write lots of code for data access. Using the Entity Framework, you can write queries using LINQ, then retrieve and manipulate data as strongly typed objects.

Entity framework performs the basic CRUD (Create, Read, Update, Delete) operations automatically. And also maintains the relationship between these classes. If you have an existing database, it generates the classes for you that will map automatically to the database tables. You can also create the database from your domain classes.

In the last chapter we had displayed the hard coded employee data. In this chapter we will create a table name as emp in sql server and display the data with the help of entity framework. Here database name is employee; you can provide the database and table name according to the application need. So first create a table as given below.

In this example, we will discuss the retrieving of data from a database table tblEmp using entity framework.
If you don't have installed entity framework on your computer, then first install. The easiest way to install entity framework is, use NuGet package manager. Using visual studio you can install this dll.
Open visual studio > Tools > Library Package Manager > Manage NuGet Packages for Solution. After that EntityFramework.dll is automatically added in references in solution explorer.
Add Employee class in Models folder as given below.
Employee.cs fileusing System.ComponentModel.DataAnnotations;
using System.ComponentModel.DataAnnotations.Schema;
namespace MVCDemo.Models
{
[Table("dbo.tblEmp")]
public class Employee
{
[Key]
public int EmpID { get; set; }
public string Name { get; set; }
public string Gender { get; set; }
public string Address { get; set; }
public double Salary { get; set; }
}
}
In the employee class we have created only employee properties. The entity framework will map this class to the existing table tblEmp in the database. For mapping we will use the attribute [Table("dbo.tblEmp")]. This attribute is available in System.ComponentModel.DataAnnotations.Schema namespace. You have to use this namespace explicitly otherwise it will give error.
Next add EmployeeContext.cs class file to the Models folder.
using System.Data.Entity;
namespace MVCDemo.Models
{
public class EmpContext : DbContext
{
public DbSet<Employee> emp { get; set; }
}
}
EmpContext class is inherited from DbContext class. DbContext class is responsible for establishing the connection to the database name as Employee. This class is available in System.Data.Entity namespace. It converts LINQ-to-Entities queries to SQL query and sends it to the database. In the above EmpContext class there is one property emp that returns DbSet<Employee> . This contains all data of table tblEmp.DbContext class will establish a connection with database, so it must know the connection sting.
We will write the connection string in Web.config file as given below:
<connectionStrings>
<add name="EmpContext" connectionString ="Integrated Security=true;Initial Catalog=Employee;Data Source=.;" providerName="System.Data.SqlClient"/>
</connectionStrings>
Now add the EmployeeController class in controller folder as we have done in last chapter. Make the changes to "EmpDetails()" action method in "EmployeeController" as shown below.
using System;
using System.Collections.Generic;
using System.Linq;
using System.Web;
using System.Web.Mvc;
using MVCDemo.Models;
using System.Data.Entity.Validation;
namespace MVCDemo.Controllers
{
public class EmployeeController : Controller
{
public ActionResult EmpDetails(int id)
{
EmpContext empCont = new EmpContext();
Employee employee = empCont.emp.Single(empObj => empObj.EmpID = = id);
return View(employee);
}
}
}
In this code, lambda expression is used. For detail knowledge of LINQ and lambda expression please see these topics separately. When you pass the ID of employee, it will give you the record of that particular employee.
Now write the following code in Application_Start() function, in Global.asax file.
Global.asaxDatabase.SetInitializer<MVCDemo.Models.EmpContext>(null);
using System;
using System.Collections.Generic;
using System.Data.Entity;
using System.Linq;
using System.Web;
using System.Web.Http;
using System.Web.Mvc;
using System.Web.Routing;
namespace MVCDemo
{
public class MvcApplication : System.Web.HttpApplication
{
protected void Application_Start()
{
Database.SetInitializer<MVCDemo.Models.EmpContext>(null);
AreaRegistration.RegisterAllAreas();
WebApiConfig.Register(GlobalConfiguration.Configuration);
FilterConfig.RegisterGlobalFilters(GlobalFilters.Filters);
RouteConfig.RegisterRoutes(RouteTable.Routes);
}
}
}
The last step is creating the view, which displays the data of employee.
EmpDetails.cshtm@model MVCDemo.Models.Employee
@{
ViewBag.Title = "EmpDetails";
}
<h2>Employee Details</h2><br />
<style>
table, th, td
{
border: 1px solid grey;
border-collapse: collapse;
padding: 5px;
}
table tr:nth-child(odd)
{
background-color: #ffe6e6;
}
table tr:nth-child(even)
{
background-color: #ccffcc;
}
</style>
<table style="font-family:Arial; font-size:medium; color:darkblue">
<tr>
<td><b>EmpID</b></td>
<td >@Model.EmpID</td>
</tr>
<tr>
<td><b>EmpName</b></td>
<td>@Model.Name</td>
</tr>
<tr>
<td><b>Gender</b></td>
<td>@Model.Gender</td>
</tr>
<tr>
<td><b>Address</b></td>
<td>@Model.Address</td>
</tr>
<tr>
<td><b>Salary</b></td>
<td>@Model.Salary</td>
</tr>
</table>
Execute the MVC application by writing the below line at the address bar of your browser.
http://localhost:57498/Employee/EmpDetails/1
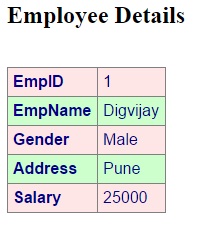
You will get the output as given below. Here, we have passed the ID as 1 explicitly. So the record of employee whose id is 1 will be shown. If you pass the ID as 2 then you will get the record of employee whose ID is two.
Output:


